

sound level meter Frequently Asked Questions
Question number FAQ-1146
Example of measurement procedures for the working environment.
Utilizing our standard sound level meter LA-1240, we measure the equivalent noise level (L Aeq) of 10 minutes of work environment noise, along with the maximum value (L Amax), and the time-weighted noise levels (L 5, L 10, L 50, L 90, L 95). The measurement values are automatically saved in the memory of the sound level meter, and those values can be transferred to a computer for processing and management using spreadsheet software (Excel) and so on.
For details such as measurement points, please refer to our separate document "Q&A Collection for Work Environment Measurement."
1. Starting the sound level meter
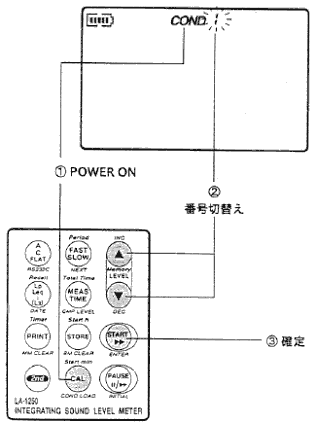
- Press the 'CAL' button while turning the power ON.
- Select measurement condition "COND 4" using the buttons "△" and "▽".
- Confirm with <START>. Turning on the <KEYPROTECT> on the bottom surface will prevent changes to the measurement conditions. For details on checking, changing, and registering the measurement conditions, please refer to item 6.
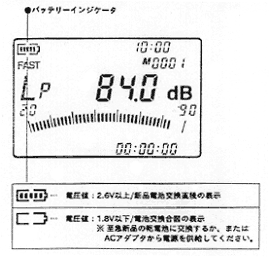
- Check the battery level.
- Press the <CAL> button and confirm that 'CAL' is displayed in the bottom right corner of the screen.
- Confirm that the noise level display is 104.0dB ± 1dB.
For more details, please refer to the instruction manual "calibration of sound level meter."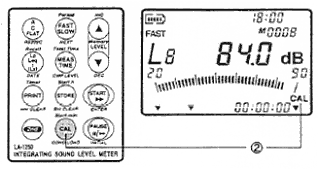
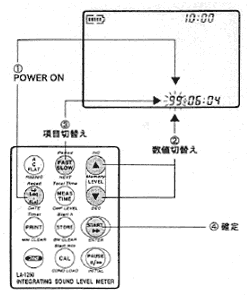
- Check the clock. If it is not correct, press <L p L eq ・・・(DATE)> while turning the power ON to set it.
- Use <△> and <▽> to change, <FASTSLOW> to shift digits, and <START> to confirm.
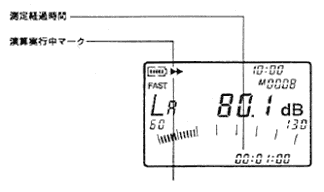
- Pressing the <START> button initiates the measurement, and it will be displayed as shown on the lower screen.
- It will automatically stop after 10 minutes.
- Save the measurement results to memory. Each time you press <STORE>, it will be saved starting from a small address. It is also possible to specify an address. Up to 300 data points can be saved. For more details, please refer to the instruction manual.
- Connect the computer to the sound level meter with a cable.
- Turn on the power of the sound level meter.
- Start the sample program's 'memory transfer'.
- The screen for setting the communication conditions of RS-232C will be displayed, so configure the conditions and press <OK>.
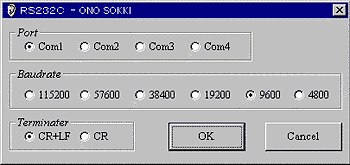
- Select 'MANUAL' in 'Memory Mode'.
- Specify the save location and file name.
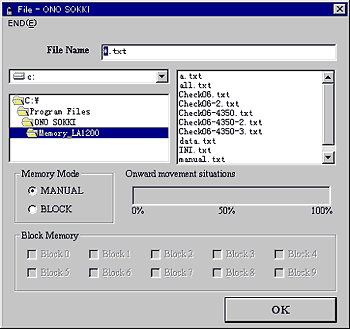
- Press <OK> to start the transfer.
- After the transfer is complete, press <PRINT (MM CLEAR)> while turning on the power to clear the manual memory (MM) in preparation for the next measurement.
- Start Excel.
- Click on 'File' in the menu and then 'Open'.
- Change the file type in the lower left corner to 'All Files (*.*)'.
- Select the file "****.txt" saved in item 4 and click "Open".
- Select the data format such as 'comma or tab' and click 'Next'.
- Select the delimiter 'comma' and click 'Next'.
- Select the data format 'G/Standard' for the column and click 'Finish'.
- A text file (***.txt) is read into Excel.
- Save this file. Click on 'File' in the menu and then 'Save As' to save.
- Connect the computer to the sound level meter with a cable.
- Turn on the power of the sound level meter.
- Start the sample program's 'memory transfer'.
- The screen for setting the communication conditions of RS-232C will be displayed, so configure the conditions and press <OK>.
- Select the "Condition Number" on the left, set the configuration items, and press <Write> to write the measurement conditions to the sound level meter.
For configuration items, please refer to the next section.
Example of 'COND 4' setting at the time of shipping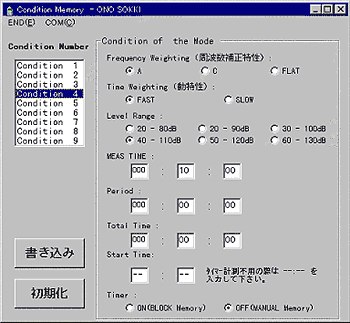
Contents at the time of shipment for COND 4
| Frequency correction characteristics | A |
|---|---|
| dynamic characteristics | FAST |
| level range | 40~110dB |
| Measurement (Actual Measurement) Time | 10 minutes |
| measurement cycle | 0 points |
| total measurement time | 0 hours |
| Measurement start time | ――:―― |
Operation check of the sound level meter
3. Start of measurement.
4. Data Transfer
5. Processing in Excel spreadsheet
6. Confirmation, modification, and registration of measurement conditions.
You can set the measurement conditions of the sound level meter from the computer. The measurement conditions can be saved to the specified panel condition of the sound level meter (COND 1 to 9).<Operation>Menu commands and settings items
• Menu bar| <END> | End of sample program for condition memory settings. | |
| <COM> | ||
| ┣━━━ | <OPEN> | Open the port. |
| ┣━━━ | <CLOSE> | I will close the port. |
| ┗━━━ | <Condition> | Return to the communication settings screen. |
Setting Items
| <Frequency Weighting> (Frequency correction characteristics) | Setting of Frequency Correction Characteristics |
|---|---|
| <Time Weighting> (Dynamic Characteristics) | Setting of motion characteristics |
| <Level Range> | Setting of Level Range |
| <MEAS TIME> | Setting of measurement time (the effective range is less than 200 hours). |
| <Period> | Setting of measurement intervals for timer measurement (the effective range is less than 200 hours). |
| <Total Time> | Setting the total measurement time for the timer (the valid range is less than 200 hours). |
| <Start Time> | Setting the start time for timer measurement (the valid range is less than 24 hours). |
| <Timer> | Timer measurement ON/OFF |
| Post | Writing measurement data into the condition memory of the sound level meter. |
| Initialization | Reset the condition memory to factory settings. |
Last updated: 2001-10-12