

Torque Meter Frequently Asked Questions
Question number FAQ-1327
Method to set the torque voltage output to 0V
The zero and full-scale adjustments of the analog output are completed at the time of shipment, so no adjustments are necessary. When first connecting the torque detector, the analog output will not be 0 V. This is because the menu settings and zero correction operations (referred to as initial matching settings) have not been performed.
The initial matching settings refer to the configuration of detector-specific values such as FACTOR after setting each item in the 'MENU', followed by performing a zero correction operation. By carrying out the initial matching settings, the torque display will read zero and the analog output will be 0 V. Please note that the zero correction operation is different from the zero adjustment of the analog output.
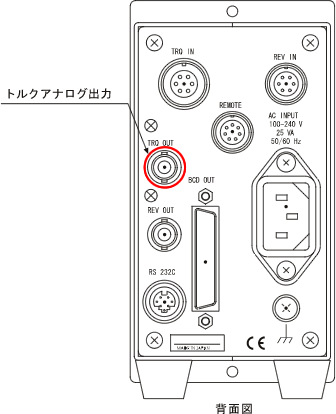
Cautions during initialization operations.
There are two methods to initialize the menu. Please note that the content of the initialization differs for each.
(Method 1) Press the "ENTER" + "LOCK" keys simultaneously while turning ON the "POWER" switch
Except for the analog output adjustment, the MENU settings will be restored to factory defaults. (The analog output will retain its adjusted state)
(Method 2) Press the "ENTER" + "MEAS/CAL" keys simultaneously while turning ON the "POWER" switch
All setting values in the MENU, including analog output adjustments, will be initialized. It is also necessary to perform the "zero adjustment" of the torque analog output.
How to perform 'zero adjustment' on the analog output of torque.
This section explains how to completely initialize the TS-2700 using Method 2, followed by adjusting the torque's analog output for zero (0V) and full scale (10V). After that, initial matching settings combined with the torque detector are performed, and the zero point is rechecked to complete the process. Note that the zero adjustment is made while reading the torque's analog output voltage with a digital voltmeter.
-
Turn off the power of the torque detector.
-
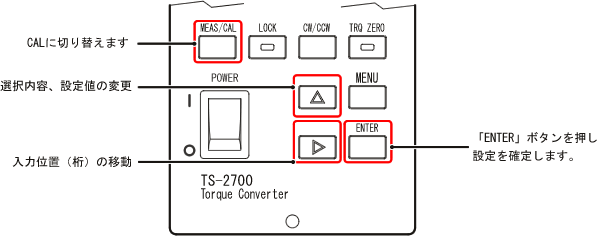
Press the 'ENTER' and 'MEAS/CAL' keys simultaneously while turning the 'POWER' switch ON. The 'MENU' settings and zero adjustment values will be activated with the factory settings.
-
Press the "MEAS/CAL" key. The display will show the zero adjustment for the torque's analog output as shown in the figure below. Read the analog output voltage. For example, if the value is -17 mV, set the zero adjustment value to -0017. Please make fine adjustments while reading the analog output voltage to achieve 0 V.
Zero Adjustment Display
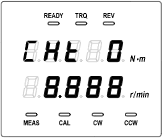
- Set the adjustment value in the lower section so that the voltage becomes 0 V when 'CHT 0' is applied.
Adjustment value: 0017 (17mV), press the 'MENU' key to set the '−'.  、
、 will set the numerical value using.
 -
Press the 'ENTER' key. The settings will be confirmed, and the display will switch to adjust the full-scale voltage.
-
Perform full-scale adjustments. Read the analog output voltage. For example, if the output voltage is 10.020 V, set the adjustment value to '10020'. Please fine-tune while reading the analog output voltage to achieve 10 V.
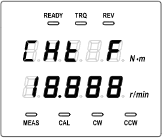
- Set the adjustment value in the lower section so that the voltage becomes 10 V when 'CHT F' is selected.
Adjustment value: 10020 (10.020 V), 、Set the numerical values.
The 4th and 5th digits will only display 9 or 10. -
Press the 'ENTER' key to confirm the settings.
-
Press the 'MEAS/CAL' key. It will return to the torque display (measurement).
-
Initial matching settings will be performed.
Please connect to the torque detector and set each item in the "MENU" according to the torque detector, as well as perform zero correction operations. For operations, please refer to the TS-2700 manual. Also, for an overview of the operations, please refer to this FAQ "How to check the zero correction value set on TS-2700". -
Confirm that the analog output voltage of the torque is 0V when in a no-load condition during measurement.
Last updated date: 2009-05-25