

sound level meter Frequently Asked Questions
Question number FAQ-1201
Measurement with a 1/1 real-time octave filter is
By attaching the optional 1/1 real-time octave analysis (LA-0563), frequency analysis using a 1/1 octave filter becomes possible.
- Measurement of instantaneous value
- Measurement of equivalent noise/single event noise exposure levels
- Measurement of NC (Noise Criteria) values
List of Precautions
- Please purchase the optional 1/1 real-time octave analysis (LA-0563) separately.
- The real-time octave filter has a gain of 10dB.
- The 1/1 real-time octave filter cannot be selected during computation.
- When the dual operation mode is selected, the 1/1 real-time octave filter cannot be selected. Please note.
- When a wide range is set, the 1/1 real-time octave filter cannot be selected. Please set an appropriate range other than wide before selecting the 1/1 real-time octave filter.
- The AC/DC signal output terminal of the sound level meter outputs the ALLPASS1 signal.
- ALLPASS refers to the level of a signal that has not been affected by an octave filter.
- ALLPASS1 corresponds to the main in dual mode, while ALLPASS2 corresponds to the sub. However, their dynamic characteristics cannot be set independently.
- Frequency analysis is being conducted on ALLPASS1.
2. Measurement of instantaneous values.
Please measure the instantaneous value using the 1/1 real-time octave filter according to the following procedure. For the method of setting basic measurement conditions, please refer to how to set measurement conditions.
◆ Operation
- Set the measurement conditions for instantaneous values.
Frequency correction characteristics Optional (Panel Switch [A/C/FLAT]) dynamic characteristics Arbitrary (Panel Switch [F/S/IMP]) Measurement Mode Instantaneous value: INST (Panel switch [Tact Max]) level range Except for wide range (Panel switch [LEVEL ▲ ▼]) - 1/1リアルタイムオクターブフィルターを選択する。
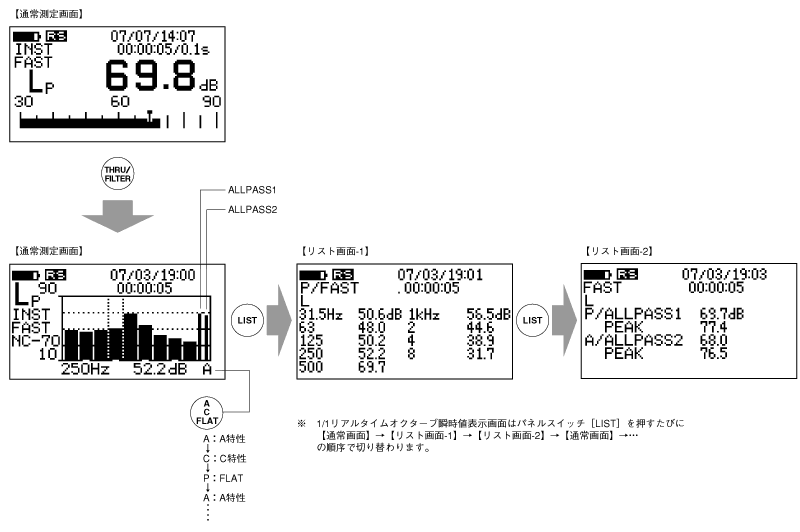
パネルスイッチ[THRU/FILTER]を押すと1/1リアルタイムオクターブフィルターが選択され、画面は1/1リアルタイムオクターブ通常画面(棒グラフ画面)に切り替わります。なお、他のオプションが組み込まれている場合には、パネルスイッチ[THRU/FILTER]を押した後、パネルスイッチ[1/11/3 R.T]を押してください。 - Switch the frequency correction characteristics of ALLPASS2.
- 最初に、切り替わった1/1リアルタイムオクターブ通常画面(棒グラフ画面)のALLPASS2にカーソルを移動します。なお、カーソルはパネルスイッチ[FILTERFREQ]を押して移動させます。次に、パネルスイッチ[A/C/FLAT]を押し、ALLPASS2の周波数補正特性を切り替えてください。
- Read the displayed instantaneous value.
- You can read the data of the bar graph by moving the cursor. Additionally, the screen displaying the instantaneous measurement data can be switched to a list view by pressing the panel switch labeled 'LIST'.
4. Measurement of Equivalent Noise / Single Event Noise Exposure Levels
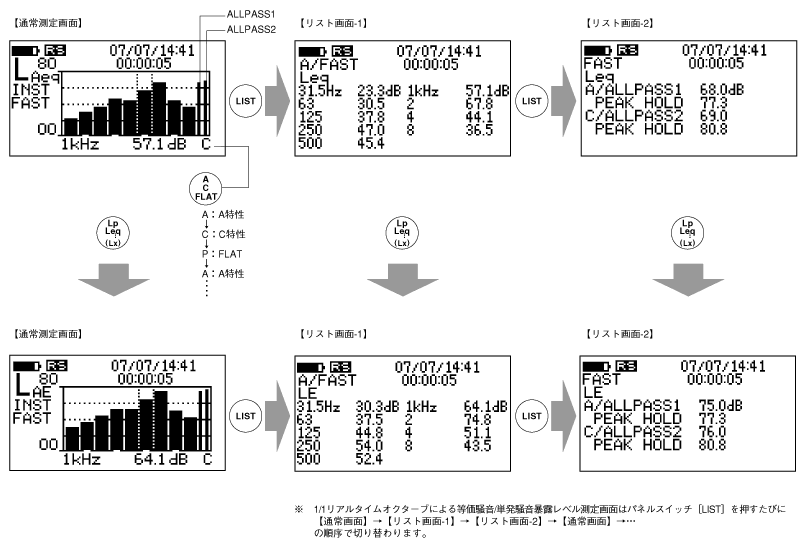
Please measure the equivalent noise/single noise exposure level using a 1/1 real-time octave filter according to the following procedure.
<Memo>
- The band peak and time rate noise level cannot be measured.
- The peak values are only for ALLPASS1 and ALLPASS2.
- The AC signal output terminal outputs the signal of ALLPASS1.
- Please note that the 1/1 real-time octave filter cannot be selected when dual operation mode and wide range are selected.
◆ Operation
- Set the measurement conditions for instantaneous values.
Frequency correction characteristics Optional (Panel Switch [A/C/FLAT]) dynamic characteristics Arbitrary (Panel Switch [F/S/IMP]) Measurement Mode Instantaneous value (Panel switch [Tact Max]) level range Other than wide range (panel switch [LEVEL ▲ ▼]) measurement time Within 100 hours (Panel switch [MEAS TIME]) - Select the 1/1 Real-Time Octave Filter.
Press the panel switch [THRU/FILTER] to select the 1/1 Real-Time Octave Filter, and the screen will switch to the 1/1 Real-Time Octave normal screen (bar graph screen).
If other options are incorporated, please press the panel switch [THRU/FILTER] and then press the panel switch [1/11/3 R.T]. - ALLPASS2の周波数補正特性を切り替える。
最初に、切り替わった1/1リアルタイムオクターブ通常画面(棒グラフ画面)のALLPASS2にカーソルを移動します。なお、カーソルはパネルスイッチ[FILTERFREQ]を押して移動させます。
次に、パネルスイッチ[A/C/FLAT]を押し、ALLPASS2の周波数補正特性を切り替えてください。 - 測定を開始する。
測定時間をパネルスイッチ[MEAS TIME]で設定した後、パネルスイッチ[START]を押して測定を開始します。
測定中は測定実行中マークが、測定時間の設定表示には測定の経過時間がそれぞれ表示されます。 - Read the measurement values from the digital display.
When the set measurement time has elapsed, the measurement will end.
The measured data can be switched by pressing the panel switch [LP/Leq…].
Additionally, by pressing the panel switch [FILTER FREQ] and moving the cursor, you can read the band data of the bar graph selected by the cursor.
Furthermore, the bar graph screen can be switched to the list display screen by pressing the panel switch [LIST].
5. Measurement of NC (Noise Criteria) values
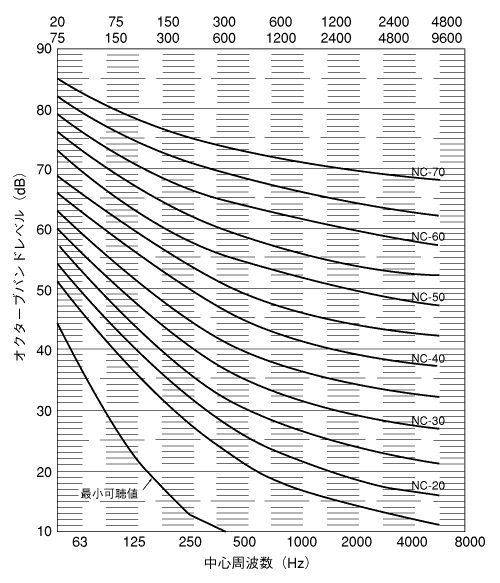
The NC value is an evaluation metric proposed by L.L. Beranek in 1957. This metric targets steady-state noise with a broad frequency spectrum, such as air conditioning noise, and is based on a large-scale survey of office noise and questionnaires given to employees working there. For the noise in question, the sound pressure levels in each octave band are compared to the NC curve shown below, and when all bands fall below the reference curve, the value of that curve is designated as the evaluation metric (NC value).
NC Curve
Measurement Method
◆ Operation
- Set the measurement conditions for instantaneous values.
Frequency correction characteristics FLAT (Panel Switch [A/C/FLAT]) dynamic characteristics Arbitrary (Panel Switch [F/S/IMP]) Measurement Mode Instantaneous value (panel switch [Tact Max]) level range Except for wide range (Panel switch [LEVEL ▲ ▼]) measurement time Within 100 hours (Panel switch [MEAS TIME]) - Select the 1/1 Real-Time Octave Filter.
When you press the panel switch [THRU/FILTER], the 1/1 Real-Time Octave Filter is selected, and the screen switches to the 1/1 Real-Time Octave normal screen (bar graph screen). If other options are incorporated, after pressing the panel switch [THRU/FILTER], press the panel switch [1/11/3. - Start the measurement.
After setting the measurement time with the panel switch [MEAS TIME], press the panel switch [START] to begin the measurement. During the measurement, the measurement in progress mark will be displayed, and the elapsed time of the measurement will be shown in the measurement time setting display. - Read the displayed measurement values.
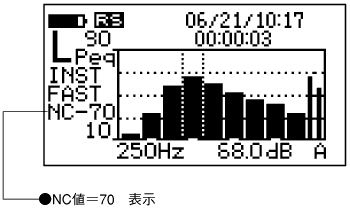
When the set measurement time has elapsed, the measurement will end. The NC value will be displayed once the measurement is complete. Next is an example screen where NC value = 70 was measured.
6. Memory Operations
This section explains the procedure for storing measurement data in memory using a 1/1 real-time octave filter, as well as the procedure for recalling the stored data. For more details on the memory function, please refer to "Chapter 4: Memory Functions and Operations" of this document. Note: Data cannot be stored if the operational data is not real-time data. Please be aware of this.
Measurement data storage procedure.
Data measured by a 1/1 real-time octave filter can be stored in memory using the following procedure.
◆ Operation
- メモリーモード(FSCAN)を起動する。
パネルスイッチ[Mem Mode]を押すとメモリーモードが起動します。 - Set the memory address to store data.
Each time you press the panel switch [Address▲・▼], the address number increases or decreases. Note that a mark (#) is displayed after the address number where data has already been stored. - 測定を開始する。
測定の詳細については、本節「7.3 瞬時値の測定」~「7.5 NC値の測定」をご覧ください。 - Select the data to store.
Press the panel switch [Lp/Leq] and choose the type of data to store. - Store the measured data.
When you press the panel switch [Store], the data measured in operation ③ will be stored to the memory address set in operations ① and ②. Once the store is complete, the address number will automatically increment by one.
Continuous storage procedure for measurement data.
◆ Operation
- メモリーモード(FSCAN)を起動する。
パネルスイッチ[Mem Mode]を押すとメモリーモードが起動します。 - Set the memory address to store data.
Each time you press the panel switch [Address▲・▼], the address number increases or decreases. Note that a mark (#) is displayed after the address number where data has already been stored. - 測定を開始する。
測定時間をパネルスイッチ[MEAS TIME]で設定した後、パネルスイッチ[2nd]、[START]を押して連続測定を開始します。 - ストアするデータを選択する。
パネルスイッチ[2nd]、[Lp/Leq]を押しストアするデータの種類を選択します。 - Store the measured data.
- パネルスイッチ[2nd]、[Store]を押すと、操作③で測定したデータが、操作①と②で設定したメモリーのアドレスへストアされます。ストアが終了すると、アドレス番号が自動的に1段繰り上がり再び測定を開始し、測定が終了するとメモリーにストアされます。ストアを終了させるまでこれを繰り返します。
- To exit the store.
Press the panel switch [2nd] and then [Store] to exit the store, but measurements will continue until the measurement time is up. (During this time, memory cannot be recalled.) If you want to recall the data immediately, press the panel switch [PAUSE].
Store Data Recall Procedure
The measurement data stored in memory can be recalled using the following procedure.
<Memo>
- When switching the address number while in a recalled state, the recalled data will also switch.
◆ Operation
- メモリーモード(FSCAN)を起動する。
パネルスイッチ[Mem Mode]を押すとメモリーモードが起動します。 - Set the address of the memory to recall.
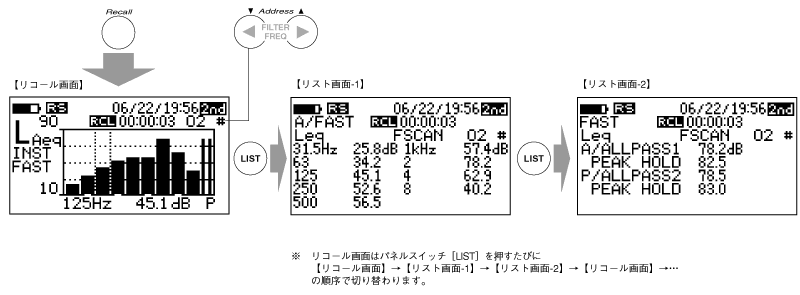
Press the panel switch [Address▲・▼] to switch to the address number where the data to be recalled is stored. Note that a mark (#) will be displayed after the address number where the data is stored. - Execute recall.
Press the panel switch [Recall] to read out (recall) the data stored in memory. The recalled measurement data can be switched to list display by pressing the panel switch [LIST]. Also, if you want to turn OFF (release) the recall, please press the panel switch [Recall] again. Next, an example of the screen for recalling data with address number 2 is described.
<Memo>
- An address where real-time data is stored will display a mark (#).
- A mark (*) will be displayed at the address where the filter scan data is stored.
Last updated: 2001-10-12