

sound level meter Frequently Asked Questions
Question number FAQ-1199
The measurement method for various calculations using dual mode is
1. Overview of Measurement by Dual Mode
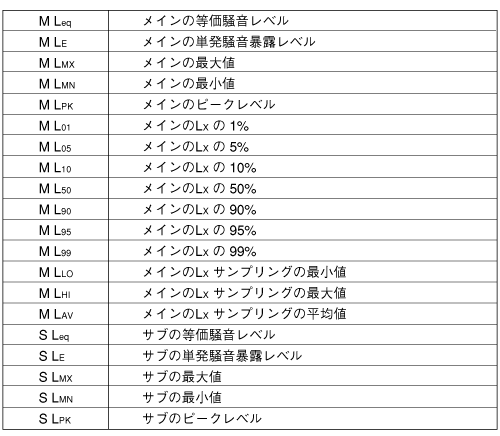
Dual mode operation refers to the ability to measure noise simultaneously under separate settings for the main (M) and sub (S) modes. While the sub mode does not have the capability to measure time-weighted noise levels, it can measure values such as equivalent noise levels and single event noise exposure levels simultaneously under individual settings, as shown in the following table.
List of measurement values by dual mode.
By performing measurements of the noise level at a time rate using dual mode, the following values can be obtained simultaneously.
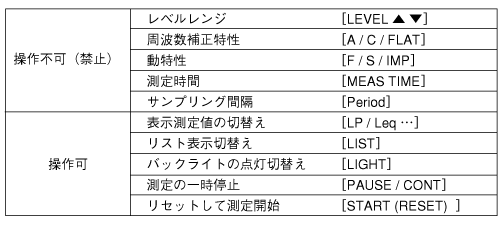
List of constraints during measurement/pause
During dual mode operation measurement or when paused, certain operations cannot be performed due to the panel switches as shown in the following table. Please note that turning off the power during dual mode operation measurement will forcibly end the measurement.
Signal output
The DC/AC signal output from the sound level meter's terminals outputs the main (M) signal.
2. Switching between dual modes
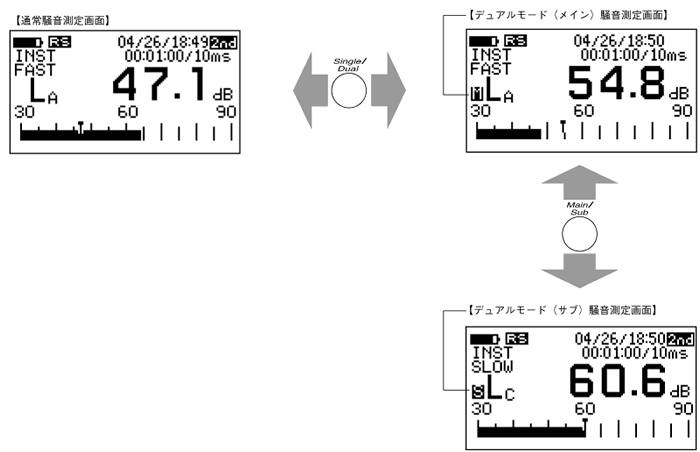
To switch from measuring normal time-weighted noise levels to dual mode, press the panel switch [Single/Dual] for function 2.
<Memo>
- If a wide range is set, it cannot be switched to dual mode. Please ensure to set an appropriate range other than wide before switching to dual mode.
Switching between main and sub
The dual mode has two types of measurement screens: main and sub. You can switch between the main (M) and sub (S) screens by pressing the function 2 panel switch labeled [Main / Sub].
4. Measurement Procedure by Dual Mode
◆ Operation
- Activate dual mode.
Press the function 2 panel switch [Single / Dual] to activate dual mode. - Set the frequency correction characteristics and dynamic characteristics for both main and sub.
After pressing the panel switch [Main / Sub] of Function 2 and switching to the main side (M), set the frequency correction characteristics and dynamic characteristics as follows.
Frequency correction: Optional (panel switch [A / C / FLAT])
Dynamic characteristics: Optional (panel switch [F / S / IMP])
Similarly, after pressing the panel switch [Main / Sub] of Function 2 and switching to the sub side (S), set the frequency correction characteristics and dynamic characteristics as follows.
Frequency correction: Optional (panel switch [A / C / FLAT])
Dynamic characteristics: Optional (panel switch [F / S / IMP]) - Set the following measurement conditions common to both main and sub.
Display screen: Optional (Panel switch [LIST])
Level range: Optional (Panel switch [LEVEL ▲ ▼])
Measured value: Optional (Panel switch [L P /L eq …]) - Set the measurement time.
- Press the panel switch [MEAS TIME] to set the measurement time. To set it to FREE, switch the setting time to 00:00:00. When FREE is set, measurements will continue for up to 100 hours (99:59:60) until the panel switch [PAUSE/CONT] is pressed. Please note that settings over 100 hours are not allowed.
- Set the L X sampling interval to 10ms.
- Press the panel switch [Period] of Function 2 to set the sampling interval. If the sampling interval is set to 10ms, there may be an overflow if the measurement time is too long. Therefore, please set the measurement time to within 1 hour. Additionally, the overflow time when the measurement values change periodically is as shown in the following table. Please refer to the table to set an appropriate sampling interval and measurement time.

- Perform the measurement.
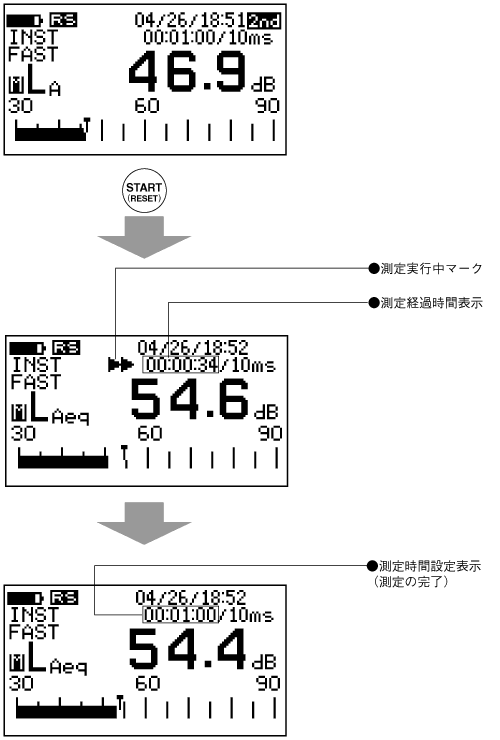
Press the panel switch [START] to begin the measurement. - During measurement, a measurement in progress mark is displayed, and the elapsed time of the measurement is shown in the measurement time settings.
- Read the measurement values from the digital display.
When the set measurement time has elapsed, the measurement will end. The measurement in progress mark will also disappear when the measurement is complete.
<Memo>
- If you press [START] again during measurement, the previously measured data will be cleared and a new measurement will begin.
- Data with over or under level warnings displayed during measurement is not reliable. Additionally, the over (OVER) or under (UNDER) level warnings displayed during measurement will not disappear until measurement is restarted.
If an over level warning is displayed, please set a new level range and perform the measurement again.
Temporary suspension of measurement.
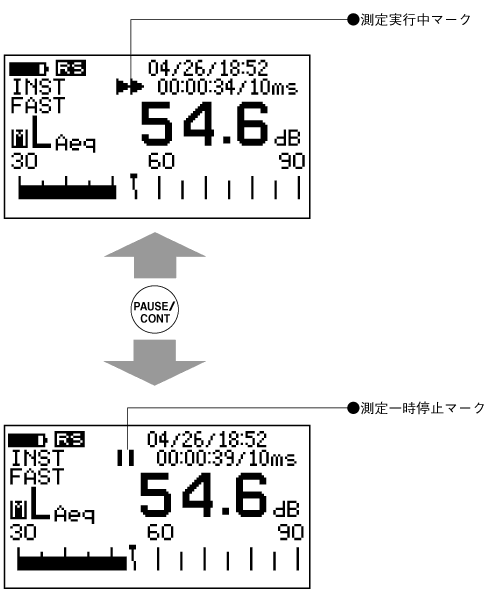
To pause the measurement, press the panel switch [PAUSE/CONT]. When the measurement is paused, the measurement in progress mark will change to a pause mark. Pressing the panel switch [PAUSE/CONT] again will resume the paused measurement.
5. Reading of measurement values.
The measured values can be displayed using the following procedures. Here, the display methods for the time-weighted noise level, equivalent noise level, single event noise exposure level, maximum, minimum, and unweighted maximum value data are shown as results of the measurements.
Display of measurement values by panel switch.
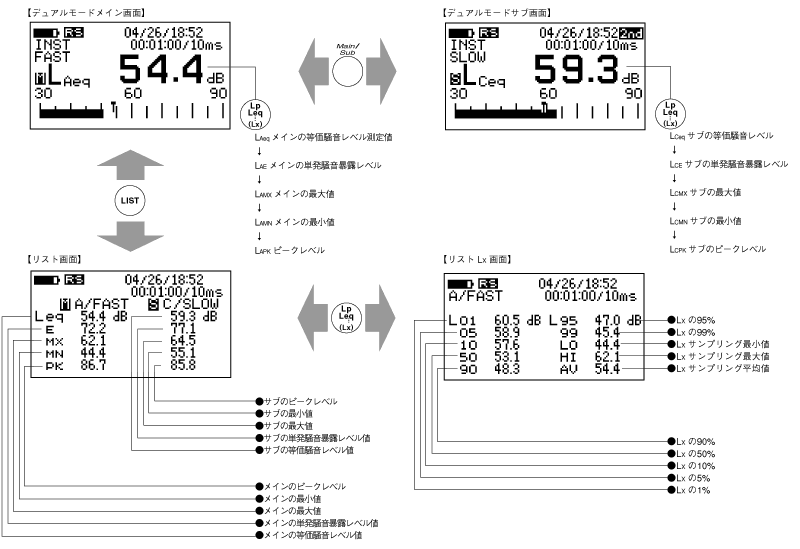
When the main or sub measurement screen is displayed, each time you press the panel switch [L p L eq …], the main or sub measurement values will be displayed in the order of instantaneous value → equivalent noise level → single event noise exposure level → maximum value → minimum value → leveled maximum value → instantaneous value…
Display of measurement values by list display.
When the main or sub measurement screen is displayed, pressing the panel switch [LIST] will show the main and sub equivalent noise levels, single event noise exposure levels, maximum values, minimum values, and unweighted maximum values all at once. Furthermore, pressing the panel switch [L p /L eq …] will display all LX values in a list.
Last updated: 2001-10-12