

sound level meter Frequently Asked Questions
Question number FAQ-1198
Measurement of the time rate noise level (Lx)
1. Overview of Time-Weighted Noise Level Measurement
The time-averaged noise level (L X calculation) refers to the representation of a level in the notation LX when the noise level fluctuates within a certain measurement period, and the time exceeding a certain level accounts for X percent of the actual measurement time. By measuring the time-averaged noise level, it becomes possible to assess environments where the noise level is irregular and varies significantly.
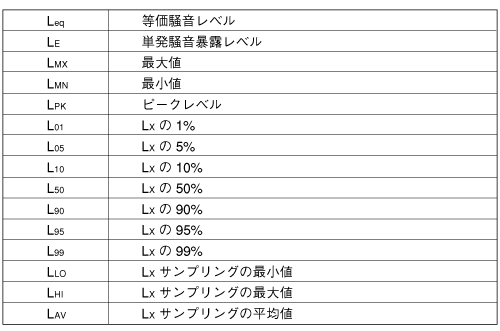
List of Time Rate Noise Level Measurements
By measuring the time-weighted noise level, the following values can be obtained simultaneously.
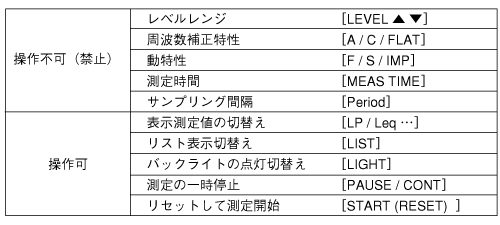
Constraints During Measurement / Temporary Pause
During the measurement or pause of the time-weighted noise level, there are certain panel switches that cannot be operated as shown in the following table. Please note that if the power is turned off during the measurement of the time-weighted noise level, the measurement will be forcibly terminated.
2. Measurement Procedure
For the basic method of setting measurement conditions, please refer to how to set measurement conditions.
◆ Operation
- Set the measurement conditions for noise level measurement.
Display screen: Optional (Panel switch [LIST])
Level range: Optional (Panel switch [△・▽ LEVEL])
Frequency correction: Optional (Panel switch [A / C / FLAT])
Dynamic characteristics: Optional (Panel switch [F / S / IMP])
Measurement value: Optional (Panel switch [LP Leq…]) - Set the measurement time.
Press the panel switch [MEAS TIME] to set the measurement time. Here is an example where the measurement time is set to (00:04:10). To set FREE, switch the setting time to 00:00:00. When FREE is set, measurement will continue for up to 100 hours (99:59:60) until the panel switch [PAUSE/CONT] is pressed. However, please note that settings for more than 100 hours cannot be made. - Set the sampling interval.
Press the panel switch [Period] of Function 2 to set the sampling interval. Here is an example where the sampling interval is set to 5s. - If the sampling interval is set to 10ms, there is a risk of overflow if the measurement time is too long. Therefore, please set the measurement time to within one hour.
- Additionally, the overflow time when measurement values change periodically is as shown in the following table. Please refer to the table to set the appropriate sampling interval and measurement time.

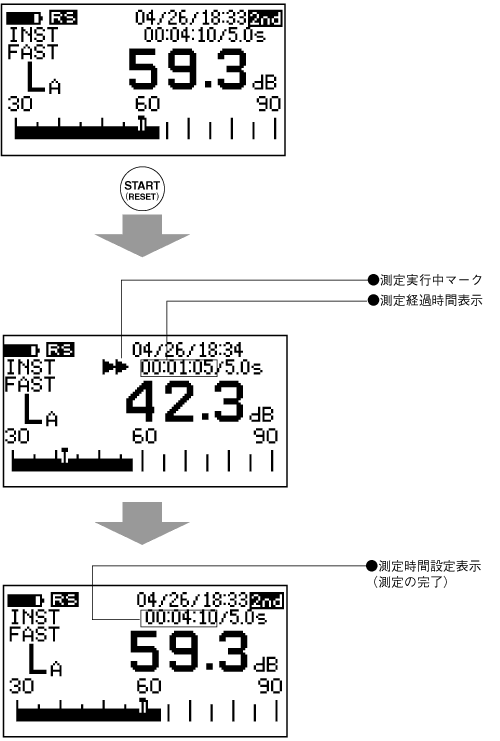
- Perform the measurement.
Press the panel switch [START] to begin the measurement. During the measurement, the measurement in progress mark will be displayed, and the setting display for measurement time will switch to the elapsed time of the measurement. - Read the measurement values from the digital display.
When the set measurement time has elapsed, the measurement will end. The measurement in progress mark will also disappear when the measurement is complete.
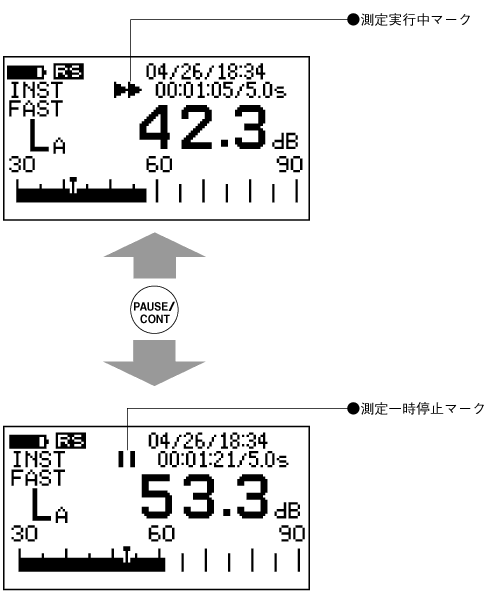
Temporary suspension of measurement.
Press the panel switch [PAUSE/CONT] to pause the measurement. When the measurement is paused, the measurement in progress mark will switch to the pause mark.
Also, pressing the panel switch [PAUSE/CONT] again will resume the paused measurement.
3. Reading of Measurement Values
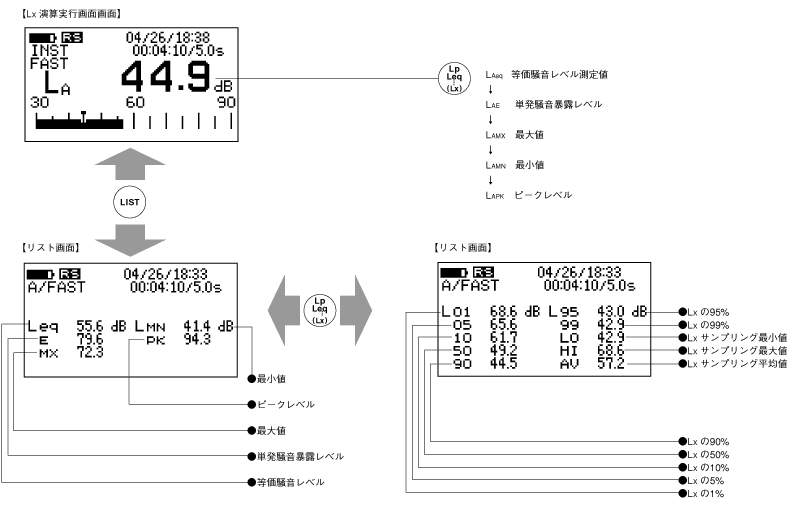
The measured values can be displayed using the following procedure. For details, please refer to the diagram below. Here, the display methods for the measured results include time-weighted noise level, equivalent noise level, single event noise exposure level, maximum value, minimum value, and unweighted maximum value data.
Display of measurement values by panel switch.
When the standard screen is displayed, each time the panel switch [L p /L eq …] is pressed, the measured values will switch and be displayed in the order of instantaneous value → equivalent noise level → single noise exposure level → maximum value → minimum value → leveled maximum value → instantaneous value…
Display of measurement values by list display.
When the standard screen is displayed, pressing the panel switch [LIST] switches to the list display screen, where the equivalent noise level, single event noise exposure level, maximum value, minimum value, and unweighted maximum value are all displayed first.
Furthermore, pressing the panel switch [L p /L eq …] will list all Lx values.
Screen switching
You can switch between the standard screen and the list while measuring. Also, during the pause of measurement, you can sequentially switch from the standard screen to the list screen, and then to the measurement values on the standard screen (panel switch [L p /L eq …]).
Last updated: 2001-10-12