

sound level meter Frequently Asked Questions
Question number FAQ-1190
Windshield, tripod, microphone extension cable, all-weather windshield
1. Assembly of measuring auxiliary tools.
Accessories such as a windscreen to assist with measurements, a separately sold tripod, and microphone extension cables ranging from 5m to 100m (AG-2000 series or 3300/3400 series), as well as an all-weather windscreen (LA-0207) are available.
Please use or purchase them according to your needs and purposes.
2. How to remove and install the preamp.
After turning off the power to the preamplifier, turning the preamplifier fixing screws clockwise when viewed from the front will tighten them, while turning them counterclockwise will loosen them. Additionally, please carefully and quietly remove or attach the preamplifier by aligning it with the connector of the main unit.
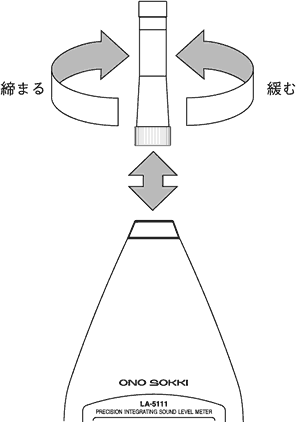
<Memo>
Always install or remove the preamplifier with the power turned OFF. The preamplifier is a precision device that contains a condenser microphone. Please handle it with care. In particular, be careful not to subject the removed preamplifier to impacts such as drops.
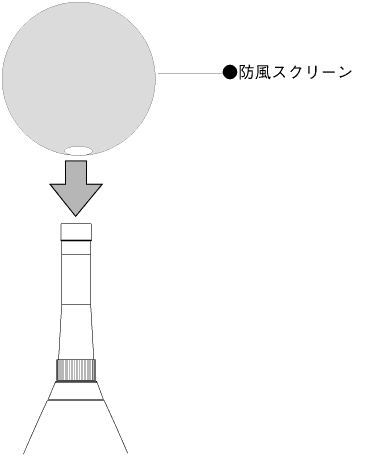
3. How to use a windscreen.
To reduce measurement errors caused by strong winds, a windscreen is provided as an accessory. Please use it for measurements of ventilation fans where strong winds directly hit the microphone and for outdoor measurements. The windscreen should be slowly and quietly inserted until the tip of the microphone touches the hole of the windscreen while the sound level meter is turned OFF.
For continuous measurements outdoors for extended periods, please purchase the separately sold all-weather windscreen.
<Note>
Please be careful not to shock the microphone when attaching or detaching the windscreen.
4. How to use a tripod and extension cable
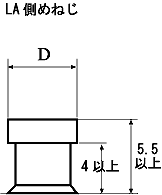
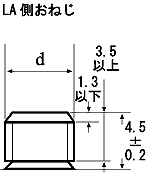
To attach the sound level meter directly to the tripod, use the tripod mounting screw located on the back of the device.
The screws on the bottom of the sound level meter are designed for camera tripod screws. They conform to JIS B7103, referred to as "1/4" screws.
(The sound level meter side has female threads.)
 |
 |
| Unit: mm | |||||||||
|---|---|---|---|---|---|---|---|---|---|
| call | Number of threads n (per 25.4mm) |
pitch | male thread | male screw | |||||
| 1/4 | 20 | 1.270 | outer diameter d | effective diameter | Path of the Valley | Diameter D of the valley | effective diameter | inner diameter | |
| reference dimension | 6.350 | 5.525 | 4.975 | 6.350 | 5.525 | 4.975 | |||
| Maximum allowable dimensions | 6.322 | 5.497 | 4.763 | not regulated | 5.820 | 5.267 | |||
| minimum allowable dimension | 6.012 | 5.355 | not regulated | 6.460 | 5.635 | 4.975 | |||
| tolerance | 0.310 | 0.142 | --- | --- | 0.185 | 0.292 |
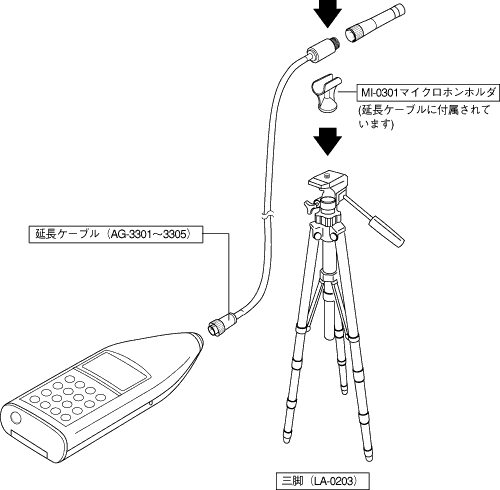
If it is necessary to further reduce the analytical effects of the sound level meter body and the acoustic effects from the measurer, it is recommended to use a separately sold tripod and microphone extension cable (AG-2000 series or AG-3301 to 3305, AG-3401 to 3405). By using the tripod and extension cable, you can set up the microphone and preamplifier away from the sound level meter body, thereby preventing external influences that can cause errors during precise measurements. Please assemble and use the tripod and extension cable in the following manner.
<Note>
・The microphone holder is included with the extension cable.
◆ Operation
- Turn off the power of the sound level meter.
- Attach the microphone holder to the tripod.
- Remove the preamplifier of the sound level meter.
- Connect the sound level meter body to the preamplifier using an extension cable.
- Attach the preamplifier to the microphone holder on the tripod.
<Memo>
Please be careful not to tip over the tripod during measurement.
| AG-2010/2030/2050/2100 Microphone Extension Cable |
| AG-3301/3302/3303/3304/3305 Microphone Extension Cable |
| Tripod specifications for LA,MI series (LA-0203C) |
| Other cables outline drawing * Please refer to the outline drawing in the download section. (Registration required) |
| BNC Signal Cable for LA Series (Main Side PIN - External BNC) (AX-501) |
| RS-232C signal cable for LA series (Main unit side RS-232C - PC side (D-sub 9PIN) (AX-5022) |
5. How to use an all-weather windscreen.
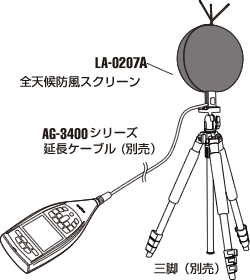
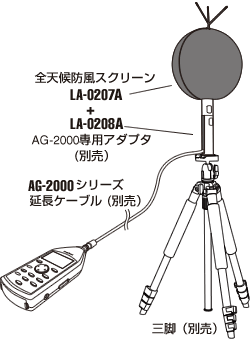
For measurements in bad weather conditions such as outdoor snow or rain, it is recommended to use the separately sold all-weather windscreen (LA-0207). (When equipped with LA-0207, it complies with JIS C 1509-1:2005 and IEC 61672-1:2002.)
Please assemble and use the all-weather windscreen following the steps below. Additionally, when using the all-weather windscreen, please purchase an extension cable (AG-2000/3300/3400 series) separately.
◆ Operation
- Turn off the power of the sound level meter.
- Attach the microphone holder to the support.
- Remove the preamplifier of the sound level meter.
- Connect the sound level meter body to the preamplifier using an extension cable.
- After attaching the sleep section of the all-weather windscreen to the preamplifier, install the screen onto the sleep section with the preamplifier.
- Attach the screen to the microphone holder mounted on the pillar.
<Note>
When using the all-weather windscreen, please refer to this diagram along with the all-weather windscreen manual.
Note: Consumable parts (windscreen, waterproof mesh) need to be replaced regularly.
Last updated date: 2004-11-15