

sound level meter Frequently Asked Questions
Question number FAQ-1188
Charging the internal battery, setting the calendar, checking the installation of options.
1. How to charge the built-in battery.
The sound level meter is equipped with a built-in rechargeable lithium battery for backup. Thanks to the built-in battery, it can retain measurement data and time data for approximately 5 months. The built-in battery automatically charges when the sound level meter is powered ON. However, immediately after purchase, please follow the steps to correctly charge the built-in battery and set the calendar.
Immediately after purchase
Immediately after purchasing the sound level meter, the internal battery may be fully discharged or only minimally charged. Please connect the AC adapter and leave the sound level meter powered on for about 24 hours to fully charge it.
Daily Care
If you use it for about an hour or more per week, there is no special need to charge it. If the usage is extremely low, it is recommended to charge it approximately once every three months.
<Memo>
- After purchase, please be sure to charge the device before taking measurements. There is a possibility that the built-in battery is completely discharged or only minimally charged.
- The internal battery used in the sound level meter is designed to withstand approximately 1000 cycles of full charge and complete discharge. However, as a precaution, it is recommended to print out important data or transfer it to a personal computer.
2. How to set the calendar (DATE SET)
After the internal battery is fully charged, please set the time on the clock using the following steps.
◆ Operation
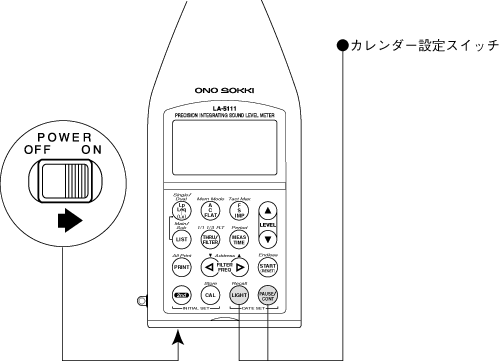
Press the panel switches [LIGHT] and [PAUSE/CONT] simultaneously while turning ON the sound level meter to display the calendar setting screen. (<3> See confirmation of option installation)
The cursor moves when you press the panel switch [FILTER FREQ]. The setting value switches when you press the panel switch [LEVEL].
Once the set calendar data is stored in memory, the screen will return to the normal measurement screen.
3. Confirmation of option installation.
The calendar settings screen also displays whether options are installed. Options that are already attached to the main unit are marked with an asterisk (*) after the model name.
Last updated: 2001-10-12