

sound level meter Frequently Asked Questions
Question number FAQ-1174
calibration of sound level meter
■ calibration of sound level meter
There are two methods for the calibration of a sound level meter: one uses an acoustic calibrator, such as a piston phone (sold separately), and the other uses an internal calibration signal.
calibration by acoustic calibration
This is a method of acoustically calibrating using devices such as piston phones. Please purchase the acoustic calibration devices separately (see below).
・SC-3100 … Frequency: 250Hz (typical value) / Sound pressure level: 124dB (typical value)
・SC-2120 … Frequency: 1kHz (typical value) / Sound pressure level: 94dB (typical value)
Notice
The sound pressure level generated by the calibrator has a value unique to that calibrator. Therefore, please be sure to check the output sound pressure level of the calibrator before performing the calibration.
calibration procedure with acoustic calibration
This document describes the calibration procedure using the sound calibrator SC-3100 as an example.
- Set the acoustic calibration device to the sound level meter microphone.
At this time, insert the microphone slowly into the inlet of the acoustic calibration device without applying excessive force.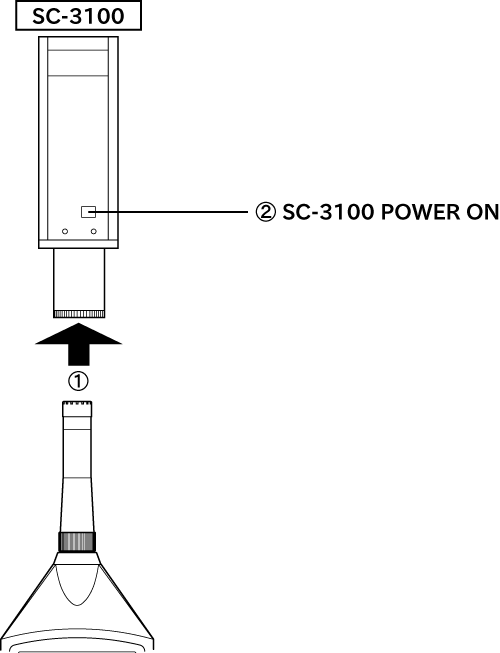
- Turn on the power of the audio calibration device.
- After switching the power of the sound level meter to ON, proceed to set the measurement conditions as follows.
a Measurement items Lc or Lp b Frequency correction characteristics C or FLAT c dynamic characteristics FAST or SLOW d level range Set in the range of 60 to 130 dB
(30 to 100 dB range when using SC-2120)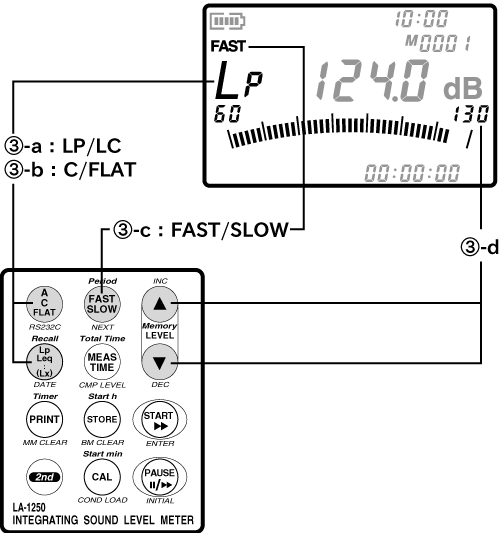
- Calibrate the reading of the sound level meter to the sound pressure level generated by the calibrator.
Using the included adjustment screwdriver, adjust the reading by turning the calibration gain adjustment volume (CAL) located on the side of the sound level meter.
calibration by internal calibration signal
Calibration using an internal calibration signal is a method of electrically calibrating the sound level meter, assuming that the sensitivity of the microphone remains unchanged. When the internal calibration signal is turned ON, a calibration signal (frequency 1kHz) is output from the output terminal. This calibration signal corresponds to a value of -6dB relative to the full scale of each level range. Additionally, the calibration signal output from the output terminal can also be used as a level calibration signal for various peripheral devices connected to the sound level meter.
Noticecalibration signals cannot be used during computation. Please note.
Calibration procedure using internal calibration signal.
- After switching the power of the sound level meter to ON, proceed to set the measurement conditions as follows.
a Measurement items Lc or Lp b Frequency correction characteristics C or FLAT c dynamic characteristics FAST or SLOW - Turn ON the internal calibration signal.
When the panel switch [CAL] is pressed, the internal calibration signal is output, and the CAL mark lights up on the LCD display screen.
At this point, please confirm that the number displayed is 6dB less than the upper limit of the level range display. - Adjust the displayed value to be 6dB lower than the upper limit of the level range display.
Using the included adjustment screwdriver, turn the calibration gain adjustment volume (CAL) located on the side of the sound level meter to ensure that it reads 84.0dB in the 90dB range (where the upper limit of the level range display is 90dB).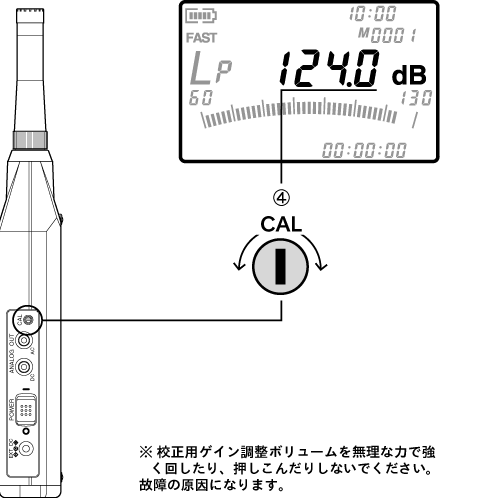
Last updated: 2002-01-09