

sound level meter Frequently Asked Questions
Question number FAQ-1148
Printer connection and setup
Printer connection and settings
Digital Printer DPU-414
The LA-1240/1250/1350/4350 can be connected to the separately sold digital printer DPU-414.
By connecting the sound level meter and the digital printer DPU-414 via the AX-5042 printer cable, it becomes possible to print out various measurement data and data stored in memory using the following two modes.
| Normal Print Mode | normal printout |
|---|---|
| Auto Print Mode | Automatically print out memory recall data and results of timer measurements. |
When using the digital printer DPU-414, please purchase the separately sold dedicated AC adapter as well.
Additionally, for handling the digital printer DPU-414, please refer to the instruction manual included with the DP-414 along with this document.
How to connect with the digital printer DPU-414
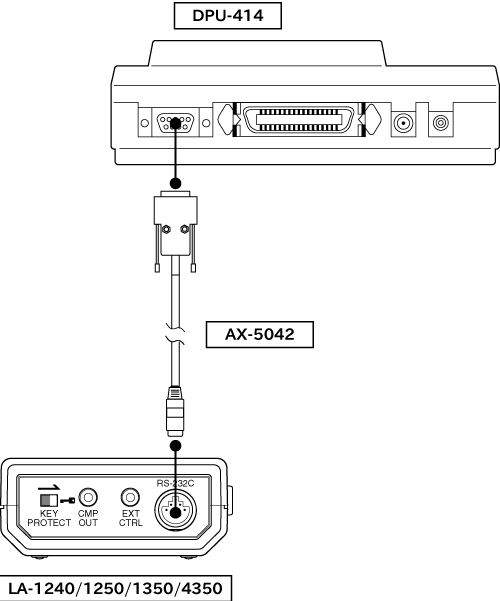
As shown in the diagram, please connect the sound level meter's RS-232C connector to the digital printer DPU-414 using the printer connection cable (AX-5042).
|
|
Procedure for Setting Communication Conditions
The communication conditions for LA-1240/1250/1350/4350 and DPU-414 are set at the factory default, allowing printing without changing the conditions on the printer side. However, if the communication conditions have been changed for any reason, please follow the steps below to reset the communication conditions.
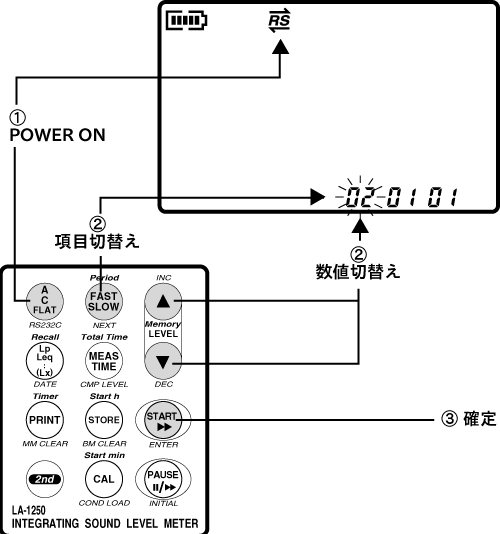
- When the panel switch [A/C/FLAT (RS232C)] is pressed while turning the power ON, the RS-232CON mark is displayed on the LCD screen, and the communication speed setting value displayed at the bottom of the LCD screen blinks.
- Set the values in the order of communication speed, terminator, and flow control.
Press the panel switch [LEVEL (▲・▼)] to toggle the value to be set.
The setting items (flashing) can be switched by pressing the panel switch [FAST/SLOW (NEXT)]. - After completing the settings, press the panel switch [START (ENTER)].
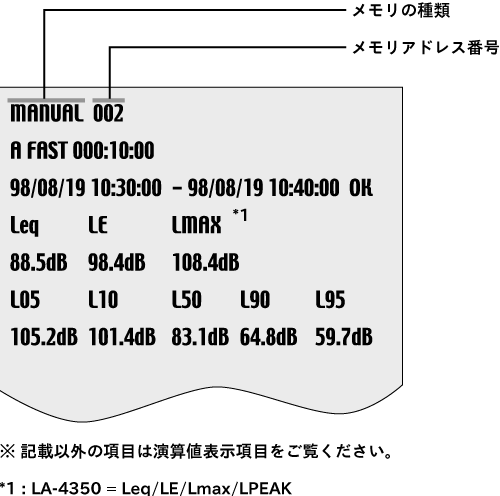
The communication conditions with the printer will be reset and the sound level meter will start. - During manual memory recall, data will be printed continuously from the currently selected address to the address where the data is stored.
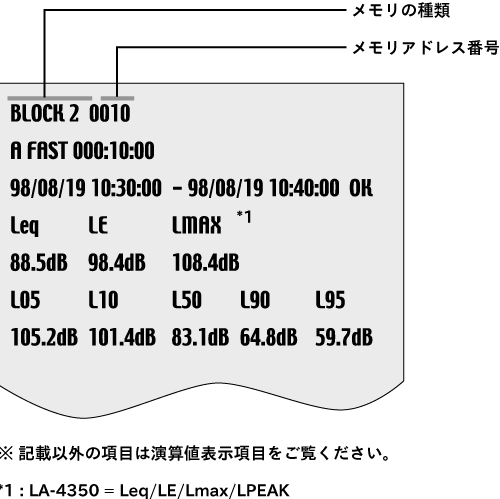
- During block memory recall, data will be printed continuously from the currently selected address to the last data of the block memory address that was measured under the same conditions.
- During timer measurement, the results of each measurement will be printed out every time a measurement is completed.
communication speed
Set the same baud rate as that of the DPU-414.
| set value | 01 | 02 | 03 | 04 | 05 | 06 |
|---|---|---|---|---|---|---|
| Transfer speed (bps) | 4800 | 9600 | 19200 | 38400 | 57600 | 115200 |
Terminator settings
When connecting to DPU-414, set it to '01'.
| set value | 01 | 02 | 03 |
|---|---|---|---|
| Terminator | CR+LF | CR | LA-200 |
Flow control
When connecting to DPU-414, set it to '01'.
| set value | 01 | 02 |
|---|---|---|
| flow control | on | off |
|
|
Print of measurement data.
Measurement data, internal memory data, and various measurement data during timer measurement can be printed from an external printer connected to the sound level meters LA-1240/1250/1350/4350. During printing, an RS-232C ON mark indicating the transmission of print data will be displayed on the LCD screen.
Print of measurement data
Pressing the panel switch [PRINT] on the sound level meter LA-1240/1250/1350/4350 transfers the measurement data to the connected external printer (such as the DPU-414) and starts printing.
Print of memory data and timer measurement data.
For the sound level meters LA-1240/1250/1350/4350, when the panel switch [PRINT] is pressed for more than 0.5 seconds during memory recall or timer measurement (except for LA-1240), the RS-232CON mark will blink, and auto-printing will start.
Automatic printing during timer measurement is possible when the measurement cycle setting is 10 seconds or more.
Print Example and Listed Items
The items to be printed are as follows.
Notice
The font used in the printed example is for explanatory purposes. Therefore, it may differ from the font that will actually be printed. Please be aware of this.
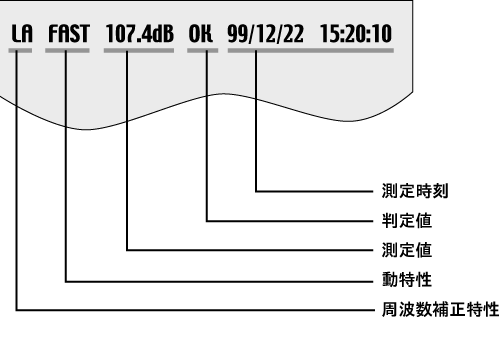
Example of instantaneous value display screen print.
|
|
|
|
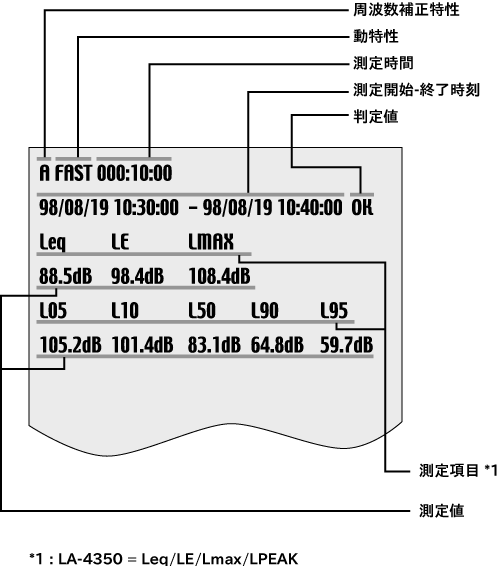
Example print of manual memory recall.
|
|
Example print of block memory recall.
|
|
Last updated: 2002-01-09