

sound level meter Frequently Asked Questions
Question number FAQ-1145
Example of Road Noise Measurement Procedure
Utilizing our standard sound level meter LA-1250/1350, we will measure the equivalent noise level (L Aeq), maximum value (L Amax), and time rate noise levels (L 5, L 10, L 50, L 90, L 95) for a duration of 10 minutes, continuously for 24 hours. The measured values will be automatically saved in the memory of the sound level meter. These measured values will then be transferred to a computer for tabulation and graphing using spreadsheet software (Excel).
1 Startup of the sound level meter
First, press the panel switch <STORE> while turning the power ON to clear the block memory. It takes about 3 seconds to clear the data. Then, turn the power OFF again.
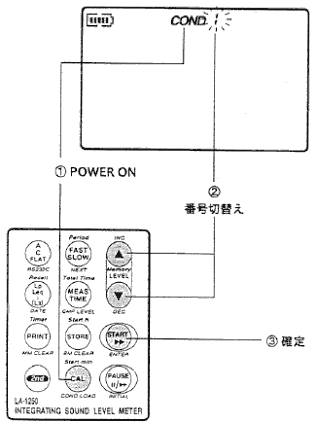
- Press the 'CAL' button while turning the power ON.
- Select measurement condition "COND 2" using the buttons "<△>" and "<▽>".
- to confirm at <START>.
- Turning on the <KEY PROTECT> on the bottom surface will prevent changes to the measurement conditions.
- For confirmation, modification, and registration of measurement condition details, please refer to item 6.
- Shipping contents of COND 2
| Frequency correction characteristics | A |
|---|---|
| dynamic characteristics | FAST |
| level range | 40~110dB |
| Measurement (Actual Measurement) Time | 10 minutes |
| measurement cycle | 10 minutes |
| total measurement time | 24 hours |
| Measurement start time | 06:00 |
Operation check of the sound level meter
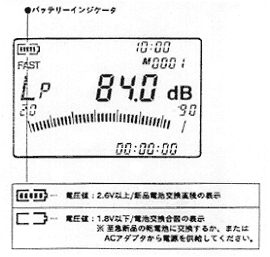
- Check the battery level.
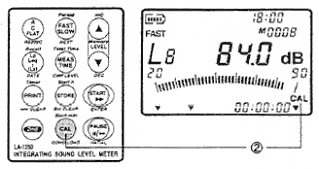
- Press the <CAL> button and confirm that 'CAL' is displayed in the bottom right corner of the screen.
- Confirm that the noise level display reads '104.0dB' ±1dB.
- For more details, please refer to the instruction manual "calibration of sound level meter."
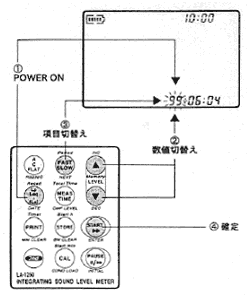
- Check the clock. If it is not correct, press <L p L eq ・・・(DATE)> while turning the power ON to set it. Use <△> <▽> to change, <FASTSLOW> to advance the digits, and <START> to confirm.
3. Start of measurement.
- Press the <START> button to set the measurement to standby.
- In the measurement waiting state, it is displayed as shown on the lower screen.
- Automatic measurement will start when the Start Time is reached.
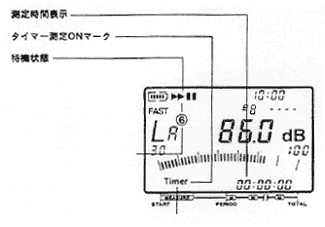
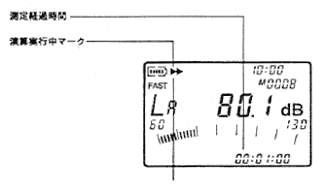
- If the start time is not set, the measurement will begin at the moment the <START> button is pressed, and it will be displayed as shown on the lower screen.
4. Data Transfer
- Connect the computer to the sound level meter with a cable.
- Turn on the power of the sound level meter.
- Start the sample program's 'memory transfer'.
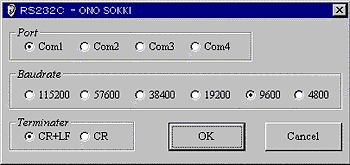
- The screen for setting the communication conditions of RS-232C will be displayed, so configure the conditions and press <OK>.
- Select 'BOLOCK' for 'Memory Mode'.
- Select the Block number to load.
- Specify the save location and file name.
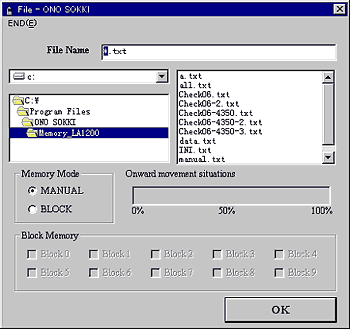
- Press <OK> to start the transfer.
- After the transfer is complete, press and hold <STORE (BM CLEAR)> while turning on the power to clear the block memory (BM) in preparation for the next measurement.
Please be careful, as the block memory will not be overwritten!
5. Processing in Excel 97
Double-click the Excel macro file "LA_Excel.xls" to launch Microsoft Excel and start the macro program. (If your Microsoft Excel is set to display a warning dialog when opening a workbook containing macros, a dialog will appear first, so please click "Enable Macros.")
When the macro program starts, a form labeled 'SetUp' will be displayed. Here, please click the 'Browse' button on the right side to select the text file saved by the sample program. If you know the file name, you may enter it directly, but to avoid input errors, it is recommended to click the 'Browse' button to select the file.
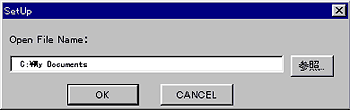
Once you have confirmed that the file name is correct, please click the 'OK' button. The file will be read automatically, and a summary table and graphs will be created.
While creating the graph, a screen will appear for entering the graph title, X/item axis label, and Y/value axis label, so please enter your preferred label names for each. The first graph created (Graph 1) will be generated using all the data from the noise summary table, with the horizontal axis representing time and the vertical axis representing noise levels. The next graph created (Graph 2) will be based on the hourly average data from the noise summary table, and will be set up with the same axes as Graph 1.
Once the creation of the noise summary table and graph is complete, a form will appear to save the final book, so please enter your preferred file name and save it.
Finally, when the 'Complete' message appears, press the 'OK' button to finish. Please note that the sheets for Data 1 and Data 2 created here are for graph creation, so do not make any changes to the data.
Change of data in the noise summary table.
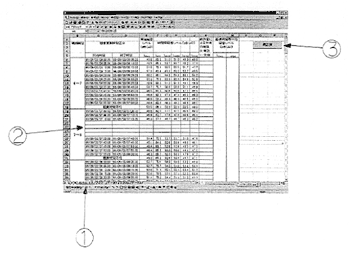
In this software, you can delete measured data or change it to any value. Additionally, after making changes, if you click the 'recalculate' button, it will automatically adjust the average calculations and graphs considering the changes.
- 1. Please select the sheet 'Noise Summary Table'.
- 2. Please change the measurement data for the areas you want to modify (LAeq, LA5, LA10, LA50, LA90, LA95).
- 3. Once all numerical changes are completed, please click the 'Recalculate' button located at the top right of the sheet (near O2). Recalculation will begin.
- 4. Finally, when the 'Complete' message appears, press the 'OK' button to finish. If you have made any changes to the data, please save the file before exiting the software.
Cautions when changing data.
- Please do not change any data other than the measurement data (LAeq, LA5, LA10, LA50, LA90, LA95).
- If you are deleting data, please keep at least one piece of data per hour.
6. Confirmation, modification, and registration of measurement conditions.
You can set the measurement conditions of the sound level meter from a computer. The measurement conditions can be saved to the specified panel conditions (COND 1 to 9) of the sound level meter.
Operation
- Connect the computer to the sound level meter with a cable.
- Turn on the power of the sound level meter.
- Start the sample program's 'memory transfer'.
- The screen for setting the communication conditions of RS-232C will be displayed, so configure the conditions and press <OK>.
- Select the "Condition Number" on the left, set the configuration items, and press <Write> to write the measurement conditions to the sound level meter.
For configuration items, please refer to the next section.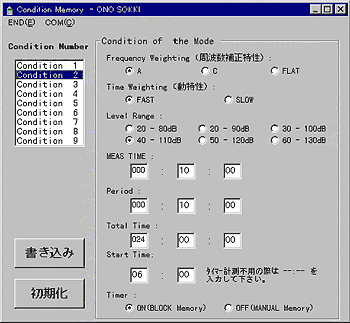
Example of COND 2 setting at the time of shipment.
Menu commands and settings items
• Menu bar
| <END> | End of sample program for condition memory settings. | |
| <COM> | ||
┣━━━ | <OPEN> | Open the port. |
┣━━━ | <CLOSE> | I will close the port. |
┗━━━ | <Contition> | Return to the communication settings screen. |
Setting Items
| <Frequency Weighting> (Frequency correction characteristics) | Setting of Frequency Correction Characteristics |
|---|---|
| <Time Weighting> (Dynamic Characteristics) | Setting of motion characteristics |
| <Level Range> | Setting of Level Range |
| <MEAS TIME> | Setting of measurement time (the effective range is less than 200 hours). |
| <Period> | Setting of measurement intervals for timer measurement (the effective range is less than 200 hours). |
| <Total Time> | Setting the total measurement time for the timer (the valid range is less than 200 hours). |
| <Start Time> | Setting the start time for timer measurement (the valid range is less than 24 hours). |
| <Timer> | Timer measurement ON/OFF |
| Post | Writing measurement data into the condition memory of the sound level meter. |
| Initialization | Reset the condition memory to factory settings. |
Last updated: 2001-10-12