

DR-7100 Frequently Asked Questions
Question number FAQ-1122
How to display sound data collected from a sound level meter and microphone as sound pressure levels using Oscilloscope Basic.
Operation Method: Recording of Audio Data for Analysis.
1. Machine settings
-1. About the input condition settings for the DR-7100
The V_RNG (voltage range) is initially set to 1 V, so considering the AC output of the sound level meter, please set it to either the "3.16 V" or "10 V" range (use 10 V for safety, and 3.16 V for accuracy). When recording sound data with a 1/2 inch microphone with a constant current preamplifier from Ono Sokki, if the expected sound pressure level is below 94 dB, set the voltage range to 0.1 V; if below 114 dB, set it to 1 V; and if above that, use the 10 V range as a guideline for setting the voltage range.
Please keep both HPF (high-pass filter) and LPF (low-pass filter) at their initial settings (OFF). Set SAMP_RNG (sampling frequency) to its initial setting (20 kHz, AC), and SAMP_MOD can be set to either "FFT" or "AUDIO". For INPUT (input format), if the recording sensor is a sound level meter, set it to AC; if it is a microphone with a constant current preamplifier, set it to CCLD.
-2. Setting of the sound level meter
It is recommended to record the sound data output from the sound level meter on the DR-7100 without applying frequency weighting.
When using models such as LA-1410, LA-1440, LA-4440, LA-2560, LA-3560, and LA-3570, it is possible to set the sound level meter to display sound pressure with frequency weighting, while the signal from the AC output terminal can be set without frequency weighting. However, to monitor the range over of the sound level meter, it is recommended to set the display without frequency weighting.
Before recording on the DR-7100, measure the sound you plan to record with the sound level meter and check that there are no range over errors in the sound level meter at the set level range. If a range over occurs, please reset to an appropriate level range. If the sound you plan to record is not reproducible and you cannot adjust the level range, it is recommended to use a wide range.
Recording of calibration signal data
In the case of recording sound with a sound level meter.
Before recording sound data, calibration signal data will be recorded. Please refer to the above "Equipment Settings" for the settings of the sound level meter and DR-7100. Connect the AC-OUT terminal of the sound level meter to the DR-7100.
● When using the internal calibration signal of the sound level meter
press the "CAL" button on the sound level meter to output the calibration signal and record it on the DR-7100. A data length of about 10 seconds is sufficient. When recording actual sound data and during the recording of the "calibration signal", please ensure that the sound level meter is set to the same level range. If recording is done across multiple level ranges, please record the "calibration signal" each time the level range is changed. When recording the "calibration signal", be sure to record the displayed value of the sound level meter. Additionally, please also record which sound data was measured at the same level range.
● When using a sound level meter
Input the calibration signal from the microphone using the sound level meter, and record the output signal of the sound level meter to the DR-7100. Ensure that the sound level meter is set to the same level range during actual sound data recording and when recording the "calibration signal." If recording at multiple level ranges, record the "calibration signal" each time the level range is changed. Be sure to record the sound pressure level indicated on the sound level meter during the "calibration signal" recording. Also, keep a record of which sound data was measured at the same level range.
● When recording sound using a constant current preamplifier microphone
Before recording audio data, perform the recording of the "calibration signal." Please refer to the above "Equipment Settings" for the settings of the microphone and DR-7100. Use an acoustic calibrator to input the calibration signal from the microphone and record the output signal to the DR-7100. Be sure to record the sound pressure level indicated on the acoustic calibrator during the "calibration signal" recording.
3. Recording of audio data
Use a sound level meter or a constant current type preamplifier microphone to record sound data on the DR-7100. Please pay attention to the level range during data recording with the sound level meter. If sound data is recorded at a certain level range, be sure to record the calibration signal at the same level range.
■ Calculation of calibration values using Oscope Basic
Import the calibration signal data recorded on the DR-7100 into Oscilloscope Basic and calculate the voltage value per sound pressure of 1 Pa.
● Calculate the voltage value of the calibration signal
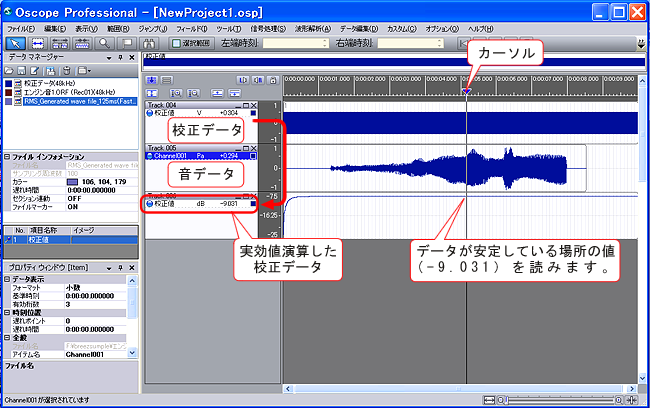
Perform effective value calculations on the calibration signal data and read the magnitude at a stable position of the effective value. The reading value "x dB" indicates that "when 1 Vrms is used as the reference (0 dB), the current signal magnitude is 'x dBVrms'." From this, when the effective value is "x dB", the voltage value expressed without using decibels is 10 (x/20) Vrms.
When performing effective value calculations on calibration signal data, please set the frequency weighting to 'Z characteristic (FLAT)'.
● Calculate the Pa value of the calibration signal
Determine what Pa value corresponds to the calibration value displayed on the sound level meter or the value displayed on the sound pressure calibrator. The displayed value on the sound level meter indicates the "sound pressure level based on a sound pressure of 20 × 10 (-6) Pa." If the calibration value displayed on the sound level meter or the value displayed on the sound pressure calibrator is "a dB," then the sound pressure at that time is 10 ((a-b)/20) Pa (where b is the sound pressure level at 1 Pa = 20 log(1/(20 × 10 (-6))) = 93.9794).
● Calculate V/EU (what 1 Pa corresponds to in V)
Divide the voltage value obtained above by the Pa value. V / Pa = 10((x-a+93.9794)/20)
calculation example
During the calibration using the internal signal of the sound level meter, if the display value of the sound level meter is 104.0 dB and the effective value of the calibration signal on the oscilloscope is -9.031 dBVrms;
The sound pressure is 3.1698, the effective voltage is 0.35355, and the calibration value (V / Pa) is 0.1115 V/Pa.
Changing file information using Oscope Basic.
By setting calibration values for the sound data included in Oscilloscope Basic, it becomes possible to read sound pressure and sound pressure levels.
● Change of calibration value
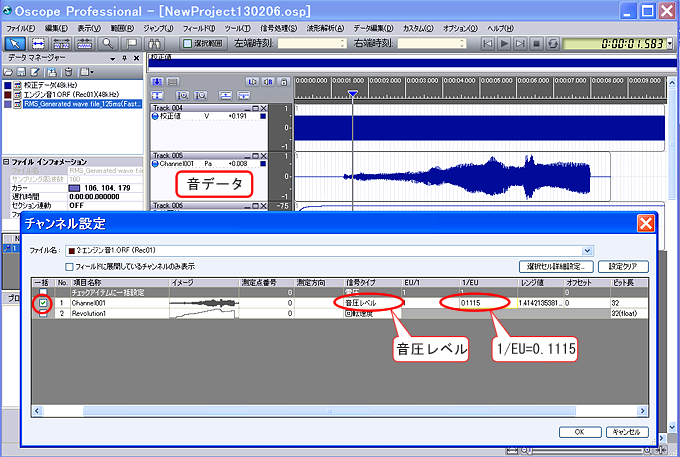
Open "Channel Settings" in "Data Editing". Change the "Signal Type" of the audio data to "Sound Pressure Level" (because the reference value when calculating sound pressure level is 20 × 10 (-6) Pa). Write the previously calculated calibration value into "1/EU" in "Channel Settings" (following the previous example, it would be 0.1115).
After this setting change, sound data can be read in Pa units. Additionally, by performing effective value calculations, it can be read as sound pressure level (dB).
Open the 'channel settings' of the calibration signal data, set the 'signal type' to 'sound pressure level', and write the calculated calibration value as '1/EU'. After this setting change, perform effective value calculations on the sound data, and if it matches the recorded calibration value at the same sound pressure level (dB), you can confirm that the calculations were correct.
Last updated: March 26, 2013