

Frequently Asked Questions about the Tachometer
Question number FAQ-0913
"Example of setting for TM-2100 series tachometer - 5: Connect to RP-704ZA-100P/R and display speed at ○○○.○ m/min"
This is the method for setting up a connection with RP-704ZA-100P/R to display the speed at ○○○.○m/min.
The TM-2100 series (TM-2110, TM-2120, TM-2130, TM-2140) is set up by pulling out the internal components as shown in Figure 2. First, please complete the setup of the TM-2100 series. The connection of the power cable and signal lines should be done after the setup.
Signal cable connection with RP-704ZA-100P/R.
Connect using cable part number: 3T5-3T5-D (5m). If a longer cable is needed, it can be manufactured to the specified length.
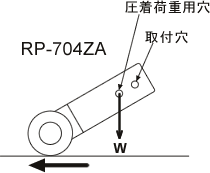
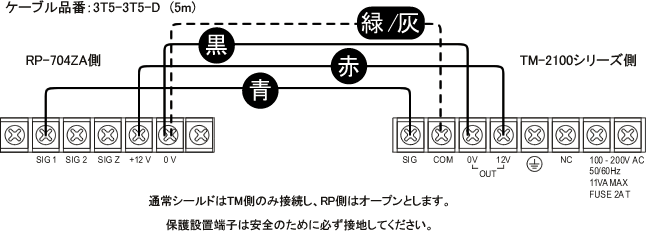
Figure 1
Settings of the TM-2100 series tachometer.
Refer to Figure 2 to set 1 to 4. I will provide additional explanations regarding the meaning of the settings. For detailed explanations of the functions, please refer to the instruction manual.
To display "000.0m/min" on the RP-704ZA-100P/R + TM-2100 series, set the multiplier and exponent to "1.0002×1/10" and the decimal point to "○○○.○".
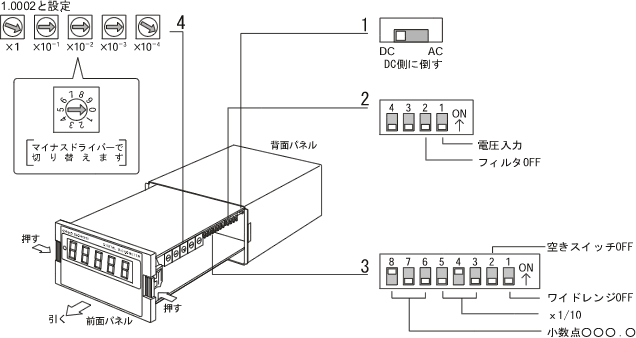
Figure 2
- AC-DC Settings
The signal from RP-704ZA-100P/R will be a high-level square wave of 12V, so it is set to "DC". Generally, if the signal is a square wave, it is set to "DC", and if it is a sine wave, it is set to "AC". - Voltage Input, Filter
The signal from RP-704ZA-100P is a square wave voltage, so set "Bit 1: OFF (Voltage Input Side)" and "Bit 2: OFF (Filter OFF)". Please set "Bit 3, 4: OFF" (these are unused switches). For open collector signals, set "Bit 1: ON (Contact Input Side)" and also "Bit 2: OFF (No Filter)". In the case of contact input, set "Bit 1: ON (Contact Input Side)" and to prevent contact chattering, set "Bit 2: ON (With Filter)". - How to find coefficients (multipliers × exponents)
Set bit 3 to "OFF" and bit 4 to "ON" (exponent = 1/10). Set the rotary switch 4 to "10002" (multiplier = 1.0002).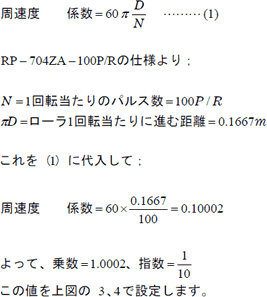
- Wide Range
When Bit 1: ON is set to 3, it becomes a wide range and the minimum measurement range starts from 0.1 Hz (0.01 m/min). During stop, it may take up to about 20 seconds of measurement time for the display to reach 0 in order to determine 0.1 Hz. When Bit 1: OFF is set, the minimum measurement range starts from 1 Hz (0.1 m/min) or more, and the display reaches 0 in about 1 second during stop. In this example, it is set to "Bit 1: ON". Also, please set "Bit 2: OFF" (this is an unused switch).
Last updated: 2009-08-24