

Digital Gauge Frequently Asked Questions
Question number FAQ-0087
Description of the preset measurement functions for DG-825, DG-925, DG-525, and DG525H.
This feature sets the display to a pre-determined value and performs measurements from that value. The maximum setting is 69.99 (or 69.999 mm).
For example, when measuring a part with dimensions of approximately 50mm ± 10mm, a 50mm block gauge is used to establish a reference point. After setting a preset measurement of 50.00, measuring the part results in a display reading of 40mm to 60mm.
measurement method
Switching of preset functions
|
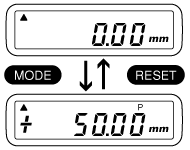
When the power is on, it displays the normal measurement function. Press and hold the MODE switch for about 2 seconds and then release it to switch from the normal measurement function, and a "P" mark will appear on the display, indicating that it has switched to the preset function. |
 |
To return to the normal measurement function.
To return to the normal measurement function, press and hold the reset switch for about 2 seconds, then release it. The 'P' mark on the display will disappear and return to 0.00.
Switch operation during preset measurement.
I will show you the operation after entering the preset function.
RESET:
Press lightly and release.
The position of the spindle at the moment the switch is pressed and released is preset and displayed with a predetermined value.
It can be measured in combination with MAX/MIN/R measurement modes. The initial values at this time are shown in the table below.
|
mode
|
Initial value (display value)
|
|---|---|
| R | 0.00 |
| MAX/MIN | preset values |
Press and hold for about 2 seconds, then release.
We will return to the normal measurement function.
MODE:
Press lightly and release.
The device switches in the order of Normal Measurement Mode → MAX Mode → MIN Mode → R Mode → Normal Mode. Select the mode you want to measure and start the measurement. Pressing the RESET button will return it to the initial value.
Press and hold for about 2 seconds, then release.
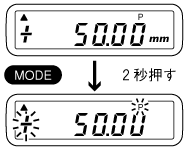
The P mark is blinking, and the display changes to allow for the input of preset values.
POWER:
The power will turn off. If the power is turned on again, the display will show the normal measurement functions.
How to set preset values
1. Switch to preset settings display.
|
Press and hold the MODE button for about 2 seconds until the "P" mark appears. |
 |
2. Setting of numerical values
The operation of settings will use the MODE switch.
MODE:
Press lightly and release.
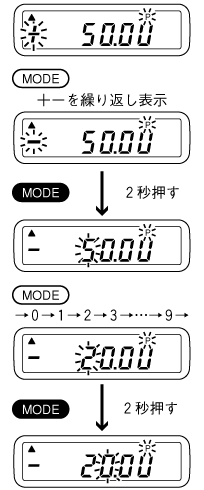
Select polarity and numerical values. By pressing, the blinking location moves from polarity +− to the digit value. The blinking location can be used to input the set value.
Press and hold for about 2 seconds, then release.
The polarity of the blinking digit is confirmed, and the blinking moves to the digit on the right.
|
(1) When the polarity (+−) is blinking, pressing the MODE switch alternates the display between + and −. To display the desired polarity, hold the MODE switch for about 2 seconds, and when the blinking moves to the next digit, release the switch.
(2) When the numbers are flashing, each time you press the MODE switch, it will repeatedly display 1→2→3→4→5...0 (the highest digit goes up to 6). To set the desired number, press the MODE switch for about 2 seconds until the next digit starts flashing.
(3) After setting the last digit, if you press and hold the MODE switch for about 2 seconds, only the "P" mark will blink. If you press it again or continue to hold it, when "mm" is displayed, release the MODE switch to complete the setting, and the set value will be saved.
(4) If you want to cancel the settings midway
(5) The preset values are remembered even when the POWER is turned off. However, performing a system reset operation will revert them to the initial value of 0.00 (or 0.000). |
 |
Last updated: 2001-01-12