

DS-2000 Frequently Asked Questions
Question number FAQ-0699
How can I specify the time interval between data points in 3D display on the DS-2000 series?
There are two methods: using the time recording function of the DS-0221, and using the fixed-time scheduling function of the DS-0222.
■Method 1: Using the DS-0221 Time Record
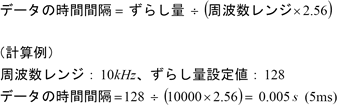
First, save the data using the time record function, and then play it back. When playing back, set the amount of shift. The relationship between the amount of shift and the time interval is given by the following formula.
- After turning on the REC button, turn on the START button to start the time recording.
- Open the Input → Record Memory → PlayBack page and set the "Shift Amount".
- Switch the screen to "ARRAY".
- After turning on the PLAY button, turn on the START button to start the 3D display.
■Method 2: Using the DS-0222 fixed-time scheduling function
Use the "Scheduled Time" setting on the DS-0222's tracking function settings page. This function imports data at regular intervals. The minimum time interval for setting the "Scheduled Time" is shown in the following table.
For online analysis: 0.1s
For offline analysis: 0.01s
For offline analysis: 0.01s
- Click Input → Tracking to open the Tracking Measurement page.
- Select "Schedule: Fixed-time schedule" and set "Sampling interval: Customizable".
- Turn on the TRACK button and start the measurement with the START button. (Perform tracking measurement)
- Click Array (Tracking) on the screen to switch to 3D view. Whether you are performing an online or offline analysis, click ARRAY display after completing the tracking analysis procedure. If you do not perform tracking measurements, it will remain as "Array (Current)". Array (Current) does not use the time-scheduled measurement function.
Last updated: 2006-12-18